The top that I'm going to show you was done a week ago but I was under a very tight deadline with a boring and loathsome report and didn't take pictures. The jeans were done over the weekend.
So, without further ado, item #3 - NYU (not your usual) wrap top: Burda 01/2008, top 116
It's a blurry picture, sorry for that. I say it is not your usual wrap top because the panel in front that simulates a camisole is cut out of a black cotton/lycra, the rest is cut in a black and white knit and, to tie it on with my general black-white-red theme and in order to avoid too much black, I bound the entire neckline and the sleeves with red cotton lycra. I took a picture to show-you a close-up of the binding but I don't know how, the picture simply disappeared from my camera! How is that possible?
The ties were a bit too short (wished I read the reviews on PR and found out about that before I cut it... ) so I'm tying them in the back not the front. Also, I wish I didn't finish this top before Debbie Cook finished and published hers - look what an ingenious idea for the ties! This is great, Debbie, I'll surely use this for the next top.
And here is a better picture of the top. For a more extravagant look, it can be tied in front, with a bow.
Even with the application of binding, it still is a quick and rewarding project. But... it does require quite a lot of fabric, I had to be really creative about it as the black and white knit was a remnant.
Item #4 - NYU jeans
These are copied from my favorite RTW jeans. I had them for more than 4 years and I wore them to death. The most flattering jeans I've ever had. They will soon be unwearable and I plan to make at least two more pairs this year. I decided to make the first pair in black, with tone-on-tone topstitching and embellishment (see below for embellishment) because I wanted a dressier pair of jeans, one that I could wear with anything, including my Chanel-style jacket.
Why are these not your usual jeans?
First, because of the fabric - it is denim but made out of linen, viscose and elasthane. Looks pretty dressy and has a bit of sheen.
Second, because of the back pocket treatment. Stole an idea from another pair of RTW jeans and instead of applying patch pockets, I made inseam pockets (in the seam joining the back yoke to the back jean), with a pocket bag in the shape of a jean pocket and with only partial topstitching on the right side - take a look, pictures speak better than my English :)
The wrong side of the jeans, showing the pocket bag
And third, because of the embellishment done on the pocket, using heirloom/hemstitch techniques by machine. I found this great resource, containing a wealth of fact sheets (pdf format), I've printed almost all of them and made a separate file. They are so great that last night, when I finally got my copy of Handsewn by Machine (ordered at the end of December) I found I already knew almost everything in the book, thanks to these fact sheets. Here is a link to the techniques (you'll get a list of files not your usual website, but the name of those files is pretty relevant). And here is the link to the fact sheet that I've used - it is a heirloom hemstitched applique.
What I did: starch well (I finally found a good spray starch) a piece of organza, hooped it (if I don't hoop it, I get a lot of channeling), drew with chalk a rectangle that would fit into my machine (that rectangle was enough to cut out two leaves - I've used the leaf in the fact sheet as a template) and covered the rectangle with a Venetian hemstitch (sorry, but I cannot find a drawing of this hemstitch), using silk thread in the needle. The first rectangle took forever (you need some practice) but the second rectangle took only 30 minutes. Oh, and I couldn't find a wing needle here (I absolutely must find an online supply for wing needles and white silk thread, they are impossible to find here) and I used the largest needle that I have - size 11o. Worked just fine - the idea is to have a needle large enough to leave holes in the fabric.
Here is the unhooped rectangle, with the stitching done:
I then drew the leaf shapes on the rectangle, stitched around them with a straight stitch and cut them out, just outside the stitched outline. Used a spray adhesive (another thing that I must find online) to attach a piece of wash-away stabilizer to the back of the pocket. I then appliqued the leaves to the pocket. It is a corded applique and for that I've used my three hole cording foot, a strand of black pearl cotton and a satin stitch (2.5 mm width, 0.4 mm length) to stitch the leaf to the jeans. I then outlined the entire applique with a pinstitch. Isn't it beautiful?
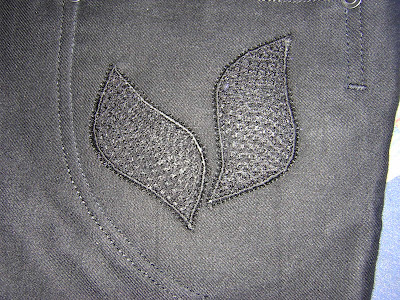
And a close up of the front pocket. I used again snaps instead of rivets - can't find decent jean rivets here, but these snaps work just great.
Tuesday, February 12, 2008
Monday, February 11, 2008
My famous blue raincoat :)
(title of a Leonard Cohen song that I love)
Now... some girls have a Birkin bag. Some girls have a Kelly.
But I am the happy owner of a Tany trenchcoat!
When I saw this picture, I thought immediately of the midnight blue taffeta that Tany sent me a while ago. This is one of the reasons for which the trenchcoat is named after her. The other reasons... do I really need to mention them? Besides being an inspiration for many of us, she is such a warm, supportive, lovely person.
Burda WOF 02/2008, 117 Coat:
I loved the "runway" look of this trench the minute I saw it. The volume in the skirt (a big trend for this spring/summer) , the shirring in the waist, the lapels with a collar with stand... all these details attracted me. The 20 rows of topstitching on the hem portion of the coat give the effect of a petticoat underneath. If you don't want that much volume on you, you could easily skip the topstitching on the hem. Without it, the coat drapes at the hem instead of standing away from the body and it looks beautiful that way too.
Speaking of topstitching, this was a very time-consuming project (I again forgot to keep track of the time I spent on this project):
- There are 8 rows of shirring in the waist. I used a tubular elastic for that, encased in a zigzag stitch (4 mm width, 3 mm length). My pearl and piping foot helped a lot, the elastic fitted in it perfectly
- There are 20 rows of topstitching on the hem (spaced at 1 cm apart/approx 3/8 inch), plus 10 rows of topstitching on each sleeve cuff. I used a silk thread for the topstitching.
- To make my life even more beautiful, I decided to add another 10 rows of topstitching on the collar and 10 rows on each lapel. It did seem like this project will never ed (sooo much topstitching) but it was worthwhile to add topstitching on the collar and lapels. Not only it ties in with the hem and cuffs, but it gives better shape and structure to the collar and lapels. If you look in the Burda pictures, you can see that their lapels are a bit floppy.
- This coat is unlined. At first I wanted to line it with a beautiful blue satin I had in my stash, but I realized that with all the shirring at the waist, lining the coat could mean some bulkier stiff gathers and I didn't want that on my petite frame. The coat being unlined, I used a Hong Kong finish on the seams (cutting bias strips from the blue satin) and I bound the pockets.
- The trench is fastened with snaps, handsewn. I eliminated the first two pairs/rows of snaps because I knew I would never wear my coat buttoned to the collar, I want it to have lapels. But I did add another three pairs of snaps after the last one (the Burda snaps stop at mid-thigh) because guess what... This trench can easily be worn as a dress as well! I wouldn't want to show that much thigh :), so more snaps were in order.
- I've added another snap at the waist, at mid-way between the bust row of snaps and the second one, which is a bit below waist. If you look at the enlarged Burda pictures, there is some strange gaping at the waist. I got the same gaping, it is due to the snaps placing, but the additional snap at the waist solved this problem.
Not MIA
Have you seen the Spring and Summer 2008 Fashion trends report on the Fashion-Era website? If not, go here. And go here for the Wardrobe planning tips for 2008.
I've just finished a project (non-SWAP related) that really got me hooked and I hope to take pictures tonight.
I'll also take pictures of two SWAP garments and post them. Tomorrow hopefully.
I've just finished a project (non-SWAP related) that really got me hooked and I hope to take pictures tonight.
I'll also take pictures of two SWAP garments and post them. Tomorrow hopefully.
Subscribe to:
Posts (Atom)