- Free AlexanderMcQueen pattern (kimono-like top)
- Free Martin Margiella pattern (dress)
- Free Junya Watanabe pattern (dress)
- Free John Galliano pattern (pirate jacket)
- Free Yohji Yamamoto pattern (mysterious jacket)
Friday, September 28, 2007
Free designer patterns (downloadable)
You might know about these, because they've been around for a while, but in case you don't or forgot where to find them, here they are:
Fourth wardrobe item
I proudly present you... Hot Patterns Artful Dodger Slouchy Man Pants (what a handful of a name :))


Pants lying flat

Back of pants

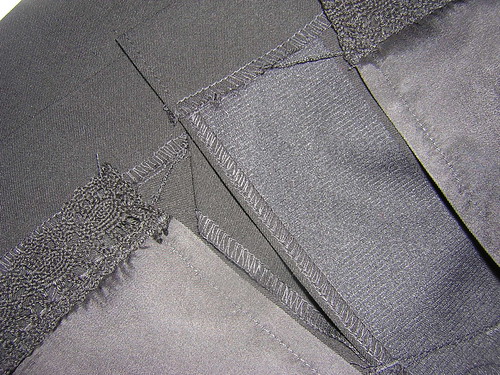
The pants are fully underlined in organza

I've used Sandra Betzina's method of underlining and finishing the seam allowances at the same time. This gives the pants a couture look.

And as I said in this post, I've applied everything I discovered by peaking inside men's trousers.
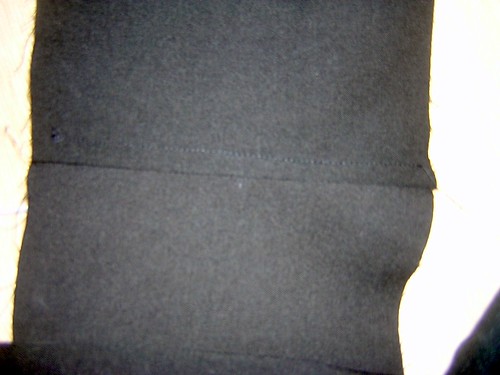
Special hem band at the hem

Facing of fly extension is cut from lining, on the bias and on the double and there is a buttonhole to secure the extension to the pants. The button (you can't see it in the picture) is sewn to the bias binding of the fly facing. Pocket bags are bound too.

"Fake" (meaning there is no pocket bag) double welt pocket, secured with buttonhole and button. I've used Debbie Cook tutorial for this and I absolutely loved it!

For the fly front, I usually follow Sandra Betzina's method. This time I followed Sigrid's tutorial and I liked it a lot.
And this is the pre-made waist band. Remember the yuck Christian Dior logo? I hated it and covered it with a silvery bray pre-folded satin bias ribbon. And I finally managed to order labels!!! Do you like them? I got 144 for 7.95 sterling pounds. Not bad, isn't it?

Read my detailed PR review here.


Pants lying flat

Back of pants

The pants are fully underlined in organza

I've used Sandra Betzina's method of underlining and finishing the seam allowances at the same time. This gives the pants a couture look.

And as I said in this post, I've applied everything I discovered by peaking inside men's trousers.
Special hem band at the hem

Facing of fly extension is cut from lining, on the bias and on the double and there is a buttonhole to secure the extension to the pants. The button (you can't see it in the picture) is sewn to the bias binding of the fly facing. Pocket bags are bound too.

"Fake" (meaning there is no pocket bag) double welt pocket, secured with buttonhole and button. I've used Debbie Cook tutorial for this and I absolutely loved it!

For the fly front, I usually follow Sandra Betzina's method. This time I followed Sigrid's tutorial and I liked it a lot.
And this is the pre-made waist band. Remember the yuck Christian Dior logo? I hated it and covered it with a silvery bray pre-folded satin bias ribbon. And I finally managed to order labels!!! Do you like them? I got 144 for 7.95 sterling pounds. Not bad, isn't it?

Read my detailed PR review here.
Wednesday, September 26, 2007
IMPORTANT POST
Dear all,
There seems to be a problem with my feeds so those of you subscribing to my blog haven't received the feed with my post yesterday.
Hope I solved the problem but I'm not sure yet and if not, I might have to change my feeds location which would mean that all of those subscribed will have to subscribe again. I would hate that but it's not up to me
Tuesday, September 25, 2007
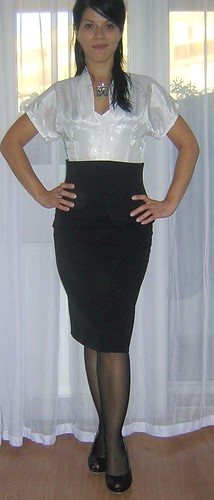
Third wardrobe piece
So, here it is, Vogue 8425....
Back,
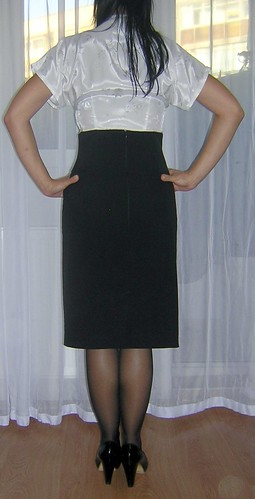
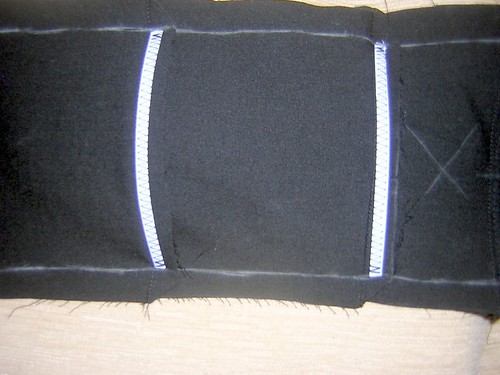
I love the high waist and wanted to keep it unwrinkled and nice-looking, therefore I've decided to add a sturdier fusible (fusibles that I buy here in notion shops don't have a name or code or whatever, therefore you've got a photo below) and boning (for that I've added a center seam to the facing instead of cutting it on the fold).

I chose that type of boning that you can sew through, because it is practical, flexible, it keeps its shape and it doesn't need any end treatment, because it doesn't poke.
I've sewn the boning to the seam allowances with a wide zigzag
Then topstitched the seam allowances closed to one side
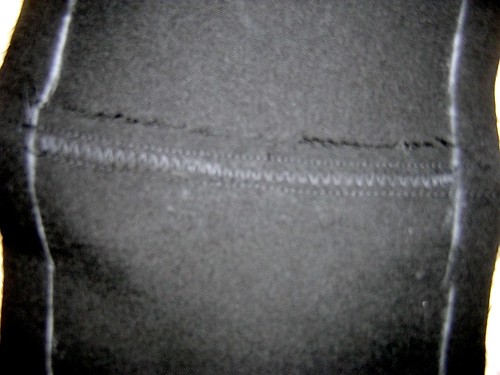
This is how it looks from the right side
I added lace at the lining hem, to make it look nicer. And in case the lining peaks, at least you have some nice sexy lace to show :)

And I've secured the hem of the lining to the hem of the skirt with finger-crocheted thread
And this is the facing stitched to the invisible zipper

To sew an invisible zipper and to cleanly join the facing to the zipper, a great tutorial by Jinjer Markley on Kathleen Fasanella's site: part 1 and part 2 of the tutorial
Since I've read this tutorial (two years ago), I've only used this method!
For more details, read my PR review of the pattern.
Back,
I love the high waist and wanted to keep it unwrinkled and nice-looking, therefore I've decided to add a sturdier fusible (fusibles that I buy here in notion shops don't have a name or code or whatever, therefore you've got a photo below) and boning (for that I've added a center seam to the facing instead of cutting it on the fold).
I chose that type of boning that you can sew through, because it is practical, flexible, it keeps its shape and it doesn't need any end treatment, because it doesn't poke.
I've sewn the boning to the seam allowances with a wide zigzag
Then topstitched the seam allowances closed to one side
This is how it looks from the right side
I added lace at the lining hem, to make it look nicer. And in case the lining peaks, at least you have some nice sexy lace to show :)
And I've secured the hem of the lining to the hem of the skirt with finger-crocheted thread
And this is the facing stitched to the invisible zipper
To sew an invisible zipper and to cleanly join the facing to the zipper, a great tutorial by Jinjer Markley on Kathleen Fasanella's site: part 1 and part 2 of the tutorial
Since I've read this tutorial (two years ago), I've only used this method!
For more details, read my PR review of the pattern.
Monday, September 24, 2007
Learning from RTW (2): Peaking inside men's trousers
I've just finished Vogue 8425 (the high-waisted skirt) in a black Italian suiting (a mix of wool, rayon and elasthane). I will take pictures tonight and hopefully post them tomorrow, together with a full review.
My next project is a pair of slouchy men's pants. I've been hesitating between Hot Patterns AD Slouchy Men Pants and McCall 4926 and I've finally decided for the HP. I've made them before (although my natural inclination is towards new patterns). Secondly, I did a quick comparison between McCall 4926 and one of my favorite pair of pants and the McCall seems awfully high-waisted (10 cm higher than this pair of pants!). Also, their leg is perfectly straight, while the HP leg is more shaped, giving a tighter fit on the hips and the beginning of the tights - which I like and find flattering. What is essential, in my opinion, for a pair of wide-leg pants to flatter your figure is: 1) very drapey fabric (forget about making them in twill, corduroy and the like - from my experience, the stiffer the fabric, the wider your thighs will look); 2) a closer to the hips and thighs pattern. That doesn't mean I won't try the McCall pattern. Only this time I must make a muslin to see what they look like. I've got this horribly green fabric anyway (what did I think when I bought it???)....
I want to copy all the details found in a men's pair of pants therefore decided to have a look at the inside of one of my husband's expensive RTW pants. Here's out I found:
1) The fly extension has a different shape, flaring to the upper part (the one connecting to the waistband). This extension also has a buttonhole, and there is a button for it, on the inside of the pants. This secures the pants.

2) The fly extension facing is cut on the bias and on the double. It also extends over the waistband facing.

3) The fly facing is finished with foldover bias tape.
4) The waistband facing is replaced with a special waist band, which is made out of lining fabric, cut on the bias and, folded in two and wrapping inside a piece of canvas or sew-in interfacing, also cut on the bias. A cross-grain tape is then sewn on the middle, to stabilise, I guess. I can find this kind of waist band, pre-made, in notion store. I can also find another kind of waist band, resembling Petersham ribbon and specifically made for pants waistbands (see the last photo in this post)
5) There's also this nice little trick to keep your belt buckle in the center of your pants and not allowing it to slide to the side....


6) The center back seam allowance are a lot wider than the rest. The waistband has a center seam too and each half of the waistband is sewn to the pants and then the entire center back seam (pants and waistband) is then sewn. This allows for easy alteration of the pants (can you tell I took in my husband's pants many times?)

7) There is a welt pocket in the back and I intend to copy this detail. I will make a fake pocket (welt but no pocket bags) as I don't really need a pocket in the back, nor do I need the supplementary bulk. It's interesting that in this pair of pants, one of the welt pocket lips (do you call them that? I can't remember the word) is wider than the other. I've never seen this before.

8) There is a special band reinforcing the hem and giving it weight. That I already knew and used for my pants.

I've hesitated a lot before deciding if to underline or not the pants with organza. I've received great advice on the Artisan's Square board, I can't thank enough everybody for being so helpful and supportive. Why did I hesitate? I would like to underline to minimize wrinkling and to give my pants that expensive look. However, I don't want the pants to become less drapey. Also, I'm not sure what kind of organza I have. I don't think it's silk, because it melts when burning with a lighter. I don't think it's poly either, because it doesn't scratch the skin a bit. You can see it in the photo below, it's very-very silky to the touch, smooth, sheer and a bit shiny. Could it be viscose? I really don't know... I think I will give it a try because I put it together with my fashion fabric and it didn't seem to change the drape. Speaking of polyester, have you read this post on Diva Ann's blog?
So, here you are: fashion fabric - another great Italian suiting (wool and viscose), mystery organza, pre-made waist band (the one with the yuck Christian Dior logo), the other waist band (Petersham-like), pre-folded bias tape, tape for the hem of the pants, a strip of bias canvas and cross-grain tape in case I decide I want to make my own waist band, men's trousers hooks (there are two types, one that you sew in and one with tiny little things that go in and are then bent - cant' explain it better than this, sorry :(), buttons.

Thursday, September 20, 2007
Second piece of my capsule wardrobe
The jacket that I talked so much about...


The jacket lying flat

The sleeve without cap ease... It looks pretty good and rounded to me and I can tell you it feels perfectly comfortable. I have plenty of moving room.

I've added some polkadotted binding...

As I already said in this post, I used techniques described in Marcy Tilton in her "Inside an Armani jacket" article (the link is in the post mentioned above). Below is a picture of the floating chest piece (attached to the roll line with a bias strip, catchstitched). I cut my own sleeve head, copying the sleeve pattern between the two notches. The sleeve head is made out of polar fleece (very good for that) and is about 2 inches wide.

For bagging the lining, I've used this tutorial on Kathleen Fasanella's site and obtained a perfect, clean finish without any handstitching. This method is great and I'll keep using it.

Also, for the sleeves, I used Bagging tutorial #1 and Bagging tutorial #2 also by Kathleen Fasanella. Very useful, the sleeve hem folds by itself and is cushioned, the tip about tacking is great. I'm not sure what wigan is, but I've used this canvas (also used for the floating chest piece), cut on the bias:

I also did my best to match the check on the houndstooth at the seams and at the sleeve (having no cap ease helps). It was very difficult, because this houndstooth (from TimmelFabrics, as my SWAP second prize) is a mix of silk and flax and it distorts very easily.


More about this jacket in my PR review.
The shoes are new... A (bit of an) early present for my birthday, from my husband.
Have I ever told you that I love shoes beyond sanity? :)

Thursday, September 13, 2007
Free Vogue pattern!
Yes, you can have a free Vogue pattern or if you buy several, the highest priced pattern will be free. Of course, you still have to pay the shipping. The offer is valid worldwide and excludes designer patterns.
The offer is made by Vogue Patterns and you can go here to take advantage of it.
The offer is made by Vogue Patterns and you can go here to take advantage of it.
Wednesday, September 12, 2007
Interesting links
- If you want to have more colour in your wardrobe, here are some very interesting tips, from Kasmira's What I Wore Today blog: Colour Yourself Happy
- How to pack a travel wardrobe, from the Wardrobe Oxygen blog
- What to do when... (getting a run in you stockings, are prone to losing buttons etc) from the same Wardrobe Oxygen
- Want to SWAP? Want to trade? Go to the SWAP and Trade forum on Supernaturale
- Want to design a nice-looking storyboard for planning a wardrobe? Want to see how a pattern would look in your actual fabric? Storyboard tute on Taking back the quality of my life blog.
- Cleaning your closet? Want to get items from other girls cleaning their closet? Go to MyGirlfriendCloset
- Planning some Fall SWAP-style sewing or see what others are planning for their wardrobe? Go to the thread on Artisan's Square
Monday, September 10, 2007
How I attach the collar to the jacket
Here's my method, which I like because it seems bulkless to me. It is a combination of several methods, some picked many years ago from the Burda illustrated course, some from sewing tips in a French magazine. I think it was Marie Claire but I'm not sure, this was 20 years ago!
First of all, my apologies because I forgot to take pictures at the beginning, therefore I must replace them with sketches.
1) If your pattern doesn't have a separate piece for the undercollar, make yourself one, by copying the upper collar and trimming 1/8 inches (3mm) all around. Sew the upper collar to the undercollar (my undercollar is cut on bias), stretching the trimmed undercollar to match the upper collar. Stop at the notches (marked with "stop here" on my drawing). Trim seam allowances if needed, turn, understitch and press. If you match the neckline seam on the uppercolar and undercollar, you will see that the uppercollar is bigger. Now fold that collar, still matching the neckline seams and put it around your neck. See now why the uppercollar is bigger? To adjust for the so called turn-of-cloth. The collar folds and rolls beautifully around your neck.

2) Sew the uppercollar to the facing (the collar's neckline seam to the facing neckline seam).

Trim, clip and press that seam open, like me:

3) Sew the undercollar to the jacket. Again, trim, clip, press open:

4) Sew the facings to the jacket.

5) Now, fold your collar and put one seam allowance of the uppercollar and one seam allowance of the undercollar together (the other two seam allowances are inside the collar). Sew those seam allowances together, either by hand or by machine (using a zipper foot in this case). Turn and press. Isn't it beautiful? Light and without bulk.

Peaking inside my WIP jacket... I've used Marcy Tilton's article for Threads, Armani jackets: The inside story:

I taped the lapel roll line with fusible tape, about 1.5 cm shorter than the roll line. The majority of the ease is in the middle third of the lapel line and the easing is done by steaming.
I stabilised the center front edges with 5/8 (1.6 cm) tape which is actually a lining selvedge. Tha tape was sewn with a basting stitch, without stretching. The tape is clipped at roll point, to allow the lapel to roll.
The armhole is stabilised with 1/4 (6 mm) twill tape - the tape is slightly stretched while sewn, thus forcing the armhole to "hug" the body - and at the shoulder, the seam allowance is pressed open for 2 inches (one on both sides of the shoulder point).

I'm also planning to attach a floating chest piece made out of canvas cut on the bias and a wigan strip (also cut on the bias) at the sleeve hem.
Stay put for the completed jacket and more inside pictures.
A very nice surprise...

I've been nominated by Lisa from Blackwater Park. What a nice surprise, I like her blog very much and find it so useful. And I really didn't know she reads my blog... Lisa, I'm honored to pass it on to (I can't keep track of everybody who's been nominated, sorry if it comes to you twice):
1) Isabelle from KittyCouture
2) Robin from Robin's Mostly Sewing Blog
3) Liana from Sew Intriguing
4) Rosanne from She's Sew Unusual
5) Sigrid from Sigrid's Sewing Projects
Happy sewing everyone!
Updated:
I've just discovered that I've been nominated also by Linda from Patterns, Fabric and Thread - Oh my. Linda, thank you very much, it's good to get good news twice on a Monday morning :)
Thursday, September 6, 2007
I've got mail
 As a bonus for subscribing to Burda WOF - Romanian version, I got the Burda supplement containing designer patterns (Burda Exclusiv Designer-Schnitte).
It contains the following patterns:
A top and skirt by Tristano Onofri


A suit by Orwell:


A trenchcoat and dress by Bogner


A trenchcoat by Aigner


Men's sportswear by Pal Zileri


And a gorgeous tuxedo jacket by Karl Lagerfeld


What's really nice is that the patterns come separately in a cardboard folder and they are ready to cut/trace, just like Big4 patterns or other patterns and not like the patterns in Burda WOF, where several different patterns are printed on the same sheet.
Subscribe to:
Posts (Atom)